

Splits the Silver Lining
 For more information about prints, please visit our product info page.
At the Bottom of the Falls

Read about this painting on my blog.
For more information about prints, please visit our product info page.
Small Works Show at Eclipse Gallery
 Last Saturday was the opening reception for "20x20", a small works show at the Eclipse Art Gallery. The show features several High Desert artists, each with 20 works no larger than 8x8". As you can see from the photo, my 20 pieces represent several attempts to work in a series. The big idea was to have all 20 with an ocean/sea/water/beach theme but it didn't quite happen (insert a rant about how impossible it is to find the time to paint with two small kids). I ended up recycling some older paintings and adding some of my Virtual Paintout pieces.
To keep the format the same, I used 6x6" Aquabords, either painting directly on them (the Virtual Paintout street scenes) or mounting completed paintings on watercolor paper or Yupo onto the boards. The mounting part is new to me, though I have been wanting to try it for a while. It was easy, I like it, and I will definitely do more!
Two of the paintings ("Fishing at the Pier" and "Roskilde") sold at the reception. The show will run through the end of the month so I'm hoping for a few more sales. I kept the price a bit lower than usual to fit in with the whole gift-shopping idea of the show. After the show closes, these little beauties will be available through DailyPaintworks and, of course, my website.


On a slightly different note, my Grand Gratitude Giveaway Week was fun. I got to try a few things in terms of marketing (mostly through Facebook, as it was a Facebook-focused event). Participation was great, especially towards the end of the week. People won cards, prints, a calendar with my art, an ACEO (tiny original painting), a portrait study, and an original painting. Did I have a ton of sales? No, but 1) I wasn't counting on them, and 2) It was just nice to give stuff away to people with genuine interest in my work. Many of the winners have supported, motivated, and inspired me for years, and I was happy to give something back. I will most definitely do something like that next year :)

DPW Hurricane Sandy Fundraiser
Did you know that I am participating in the Daily Paintworks Hurricane Sandy Fundraiser? Out of the two paintings I donated, one is still available (with the auction ending in several hours):

- and the other one sold to a new collector in Massachusetts:

This is an awesome way to buy artwork and contribute to a good cause (all proceeds are donated to Hurricane Sandy relief efforts, in my case I donated to American Red Cross). Sometimes, I even get fancy and gift-wrap paintings that I ship to their new homes:

Also, if you are an artist, consider participating in the fundraiser yourself! There is no cost to enter and shipping is paid by the buyer.
Day 1 of Gratitude Giveaway and Free Shipping Week
 Today is Day 1 of the Gratitude Giveaway! The winner of today's drawing will receive a set of 3 greeting cards. For more details, go to my Facebook page.
As part of my Gratitude Giveaway Week, I am offering free shipping on all orders from my website! Enter discount code Thanks2012 at the checkout!
Welcome to Gratitude Giveaway!
Thanksgiving is just a week away (yep, I know it might be a surprise for some of you..it was for me)! I love this holiday, and not even for the food. I love the idea that at the very least once a year, you get to pause and take inventory of all the things you are, or should be, thankful for. It doesn't even matter who you are thanking, it's more in the experience of gratitude itself.

This year, I am celebrating the whole week before Thanksgiving and I would love for you to join me! I am grateful for your interest, support, and encouragement without which it would be a whole lot harder for me to keep painting. With Thanks, I will be Giving something away every day - from greeting cards to an original painting. Daily giveaways will be happening on my Facebook page with a final drawing for an original painting on November 21. Daily giveaway rules will be announced on Facebook. To be eligible to win the original painting, you can do one or more of these things (each counts as one entry):
- "Like" my Facebook page
- Sign up for my newsletter
- Sign up for blog updates (see box on the top right)
- Comment on any of my blog posts...as long as it's relevant
- Comment on this blog post telling me about a thing or two you are thankful for this year
- Share my website with your friend on any social network (just make sure you let me know about it)
- Tweet about me (giveaway, website, art) and mention @YevgeniaWatts
- Mention me on Google+
- Participate in one or more Facebook daily giveaways
Like I said, all of these are ways to enter more than once, so if you, say, sign up for the newsletter and the blog updates, you entered your name twice!
Ready...Set...GO!
marble eyes
Wet-into-wet Watercolor Portrait Study Step by Step
in step by step
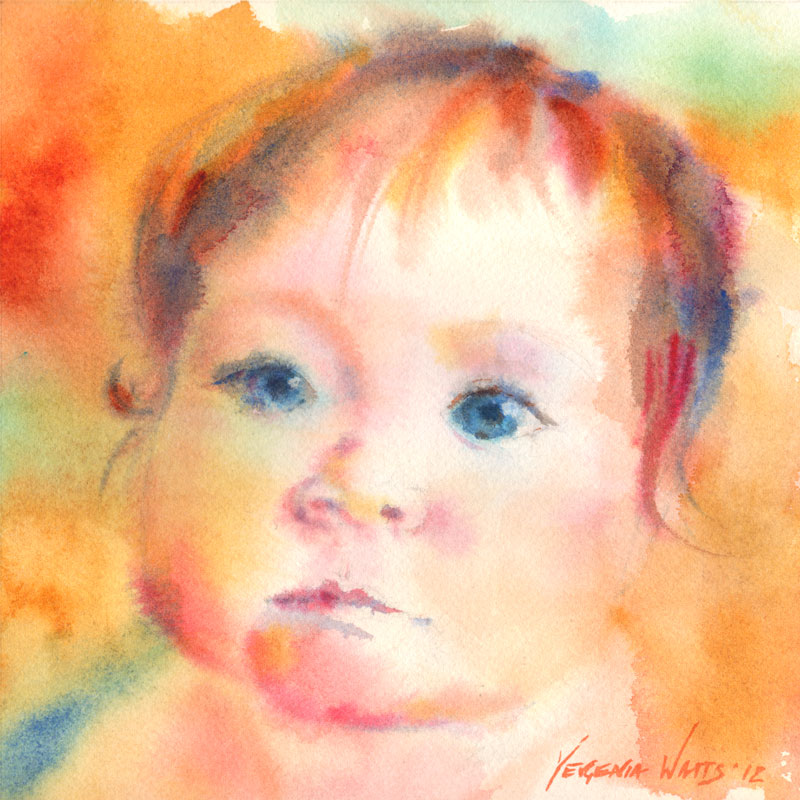
Partly because of the mounting pressure (grandparents, friends, random people who make the connection between the artist and the baby) to paint my beautiful baby daughter, and partly because I just needed to paint something and enjoy it, I made this little wet-into-wet study. I call it a study because I have a grand idea to make two largish (24x24 or larger) paintings of my kids to go on our bare walls.
Here is the reference photo:
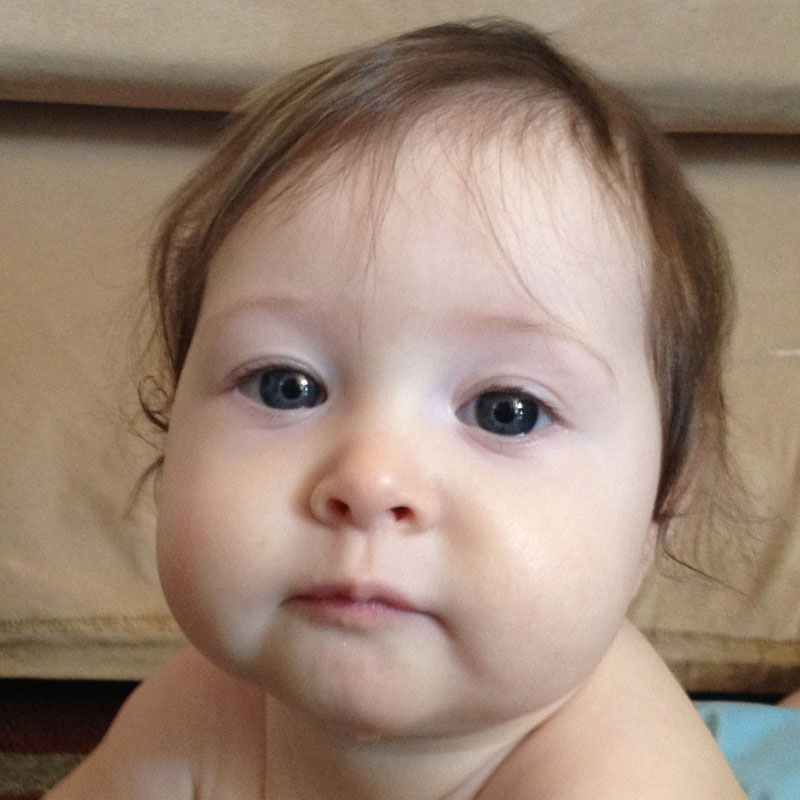
katia marble eyes reference photo
There were pretty much just three steps in this painting:
marble eyes ip 1
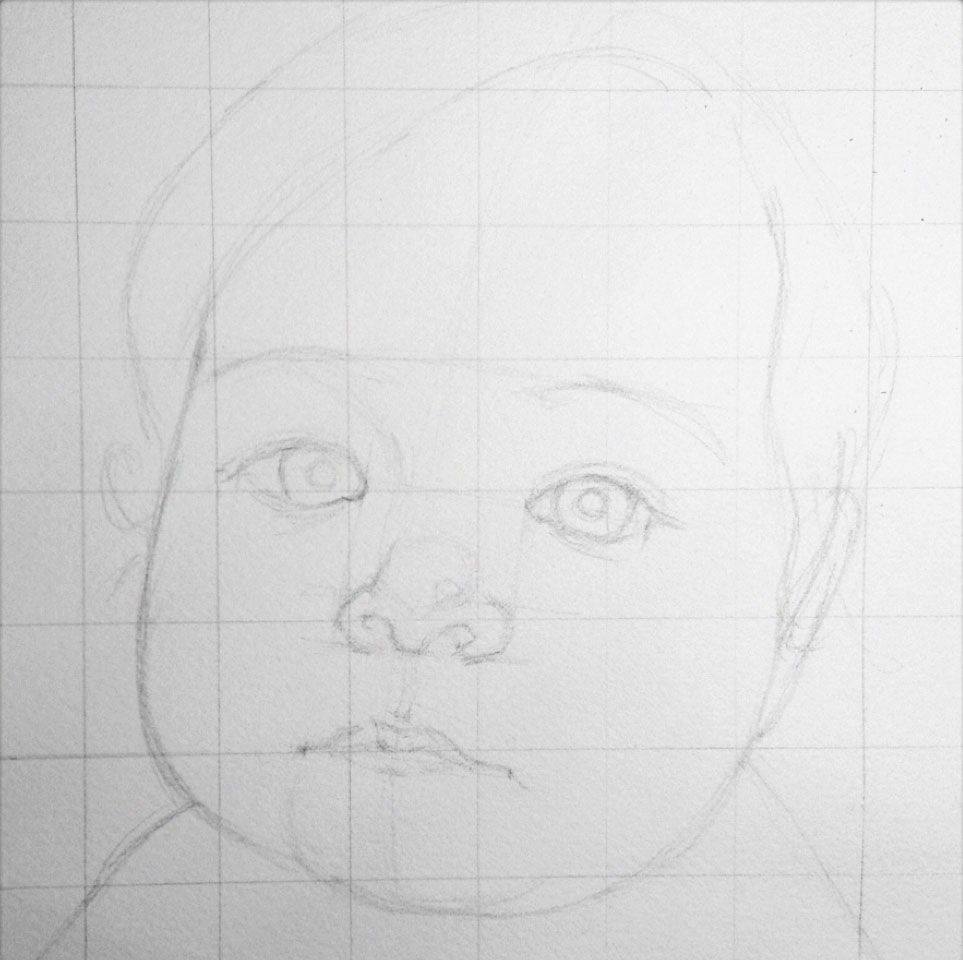
Step 1. Drawing. I used the grid method, with grid lines every inch.
katia marble eyes ip 2
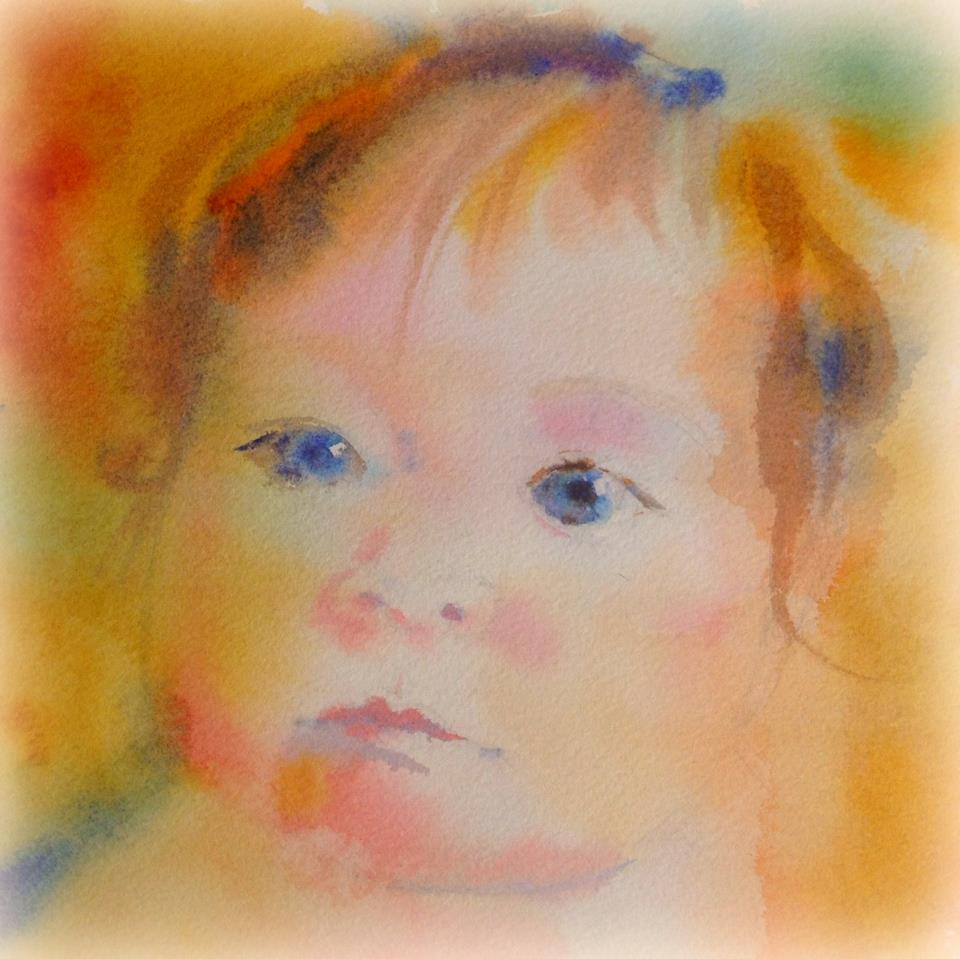
Step 2. First layer, wet-into-wet (except for the highlights in the eyes, those I left dry).
katia marble eyes
Step 3. Another layer of wet-into-wet, with a few details added. I wanted to keep everything soft except for the right eye, so I left most of the edges alone without going back and defining them more. I can see so many things not quite right with this painting...especially when comparing to the reference photo - but at some point, you just have to let it go. Overall, I am happy with the freshness and softness I was able to achieve. What do you think?
P.S. Want me to make a painting from your photo? Read more here or contact me right away.

Silver Lakes Arts and Crafts Fair this Saturday!
 Come see me! This will be the only A&C fair I am doing this year (decided to take it easy for a while, with the baby and all). I will have some new original works and prints, a huge selection of cards, and a sale section. If it's not too busy, I usually do demos at my booth as well.
15th Annual Silver Lakes Arts & Crafts Fair
27801 Mountain Springs Rd, (Club House)
Helendale, CA
Saturday October 20th
9 am - 3 pm

Just saw myself in a newspaper!
 A very tiny local newspaper, mind you ("High Desert Community News"), and a very tiny article - but I absolutely did not expect it! If you are wondering what I am holding in my left hand, why, it's not a palette. It's a styrofoam plate which did at some point hold snacks. Not sure why I'm just standing there and holding an empty plate...
I also received three checks in the mail today and a huge #8 Da Vinci Russian Blue Squirrel Quill brush! A nice day, I think :)

virtual paintout roskilde
Roskilde, Denmark - Virtual Paintout
This September, the Virtual Paintout travelled to Denmark , the island of Zealand. I managed to get back on board and participate. It was fun, as usual, and the town of Roskilde, where I "landed", is a gem. I kept the 6x6" Aquabord format (most of my other Virtual Paintouts are the same) and decided to try walnut ink with a special bamboo pen/brush that I got from Daniel Smith. Well, it turns out that the walnut ink is NOT waterproof (and I always learn about those things in the middle of working on a painting, not on a scrap). My usual process is to do the ink drawing first and then apply watercolor on top. In this case, I had to re-apply the ink on top of the dry watercolor - which I mostly don't mind, it gives the painting a bolder look. The bamboo pen feels a bit awkward and leaves blobs of ink if you are not careful, but it's probably just a matter of getting used to a new tool.
A couple of words and a video about my portrait show
http://youtu.be/nvFVAv4H-Ro The show opened on September 8 and, while nobody got stampeded, it was a good evening with new and familiar faces. The best thing, all those who showed up seemed to have a genuine interest and appreciation for my art. I set up an easel to paint but didn't have a chance to do very much painting - my time was occupied with friendly conversations :). My husband (who, by the way, made most of the frames from scratch) was with me and we brought our 5-month old daughter Katia (you will see her in the video, flying by). Elijah, who is now 3 years old, stayed with a friend. He talks a lot now and gets bored easily, so he could be quite a distraction.
I tend to keep myself from getting excited about things, for the fear of being disappointed. Well, in this case, I got more and more excited as the show opened and continued. I spent a several days getting ready for the "Artist Speaks" gallery talk, which was essentially a presentation about my A Portrait A Day project (I will probably make it into another video with voice-over. Or at least a pdf). It is a great feeling to see a body of work that you have spent some time working on hanging on the gallery walls, all nice and presentable. It gave me something very close to a sense of accomplishment, and also, fascination, that people would take the time and come see my paintings and even buy them. Completely different from a group show or an art fair. Here would be a good place to thank the Eclipse Gallery and Joan Sowinski for making this show happen. Thank you!
New Video Demo: Green Apple Wet-Into-Wet
http://youtu.be/Ejf8PuYUSUo Enjoy! You might know by now that wet-into-wet is one of my favorite ways to paint in watercolor. Now you can watch me do it! :)

Solo show opening this Saturday!

Remember "A Portrait A Day"? No? Well, it's been a while. It was a project I did in 2010-2011. I decided that I would paint a small portrait (most of them are 9x12") every day and limit myself to 30-60 minutes per painting. This upcoming show highlights the best of the 60+ paintings that I completed. It is my first solo show at a gallery, and definitely the first one of such a large scale. I would love to see you at the reception!
Julie in Redlands - Figure Painting
 I have a backlog of figure paintings and sketches that I still need to post, and this is one of them. Painted during a nice day, en plein air, in a backyard in Redlands :)
Pears wet-into-wet
 Wet-into-wet watercolor painting is relaxing (at least, that's what I think :), I'm sure there are many people who find it just as frustrating). You get to watch the paint move, colors shrink and expand, bleed into each other, so juicy and vibrant. You get to experience the different levels and stages of wet watercolor paper - from the shiny pool of water through saturated but only shimmering to satin magic state where the blossoms happen, to matte but cool to touch, which is the danger zone , to bone dry. Wet-into-wet watercolor is poetry.


sunflower palette knife
Sunflower with a palette knife
Another sunflower for today! This time, I put the color down wet-into-wet and pushed it around with a palette (or, rather, painting) knife to create the petals. This is one of the most recent paintings done as a demo for my adult watercolor painting students. I also started teaching middle/high school age kids. Still trying to figure out how much I like doing it. On one hand, the kids need much less directing and teaching than adults do - they generally have more confidence in their artistic abilities - on the other hand, they are often less motivated and definitely less serious about this whole traditional art business...
collen
Colleen - Portrait of Little Girl with Pumpkin Step by Step
First of all, let me say that I was immediately inspired to paint this portrait when I saw the reference photo. I love the backlit figure against the pumpkin patch background, the abundance of rich colors and, of course, the priceless expression on the little girl's face. I knew it was going to be a good painting right away.
I started with a thumbnail sketch, with a bit of color to help me plan the painting and communicate to the client what I see when I look at their photo:
collen sketch
After the sketch, I stretched my paper and made the drawing using the grid method.
colleen step 1
A word about using the grid method with portraits: after you find your reference points and locate the facial features, make sure you double-check your drawing with the usual facial proportions rules. I.e, the vertical center line hits the features in the middle, the horizontal lines of the eyes, bottom of the nose, and mouth are parallel, the distance between the eyes is approximately the width of one eye, the lines from the wings of the nose to the inside corners of the eyes are parallel, etc.
colleen face
Next step: wet-into-wet background wash and ultramarine blue in the shadow areas. I also put light yellow, red, and orange washes over the skin areas.
collen in progress 2
Next, I continue working on the hair and face, put a wash over the shadow side of the pumpkin and reclaim the round shape of the pumpkin on the right using a scrubber brush.
colleen ip 3
Next, more work on the pumpkin and main shapes of the face. i also deepen the skin tones using transparent quinacridone red and quinacridone burnt sienna.
colleen in progress 4
Next step. I might be guilty in spending too much time an effort on the hair, but I just can't help it. I like painting hair. I darken the shadows throughout the painting, define the eyes, soften the hard edges around the hand and add detail to fingers and the girl's dress. Almost done.
colleen in progress 5
From the last stage to the completed painting, it's just a matter of deepening the shadows even more and refining the important details. I also add a few spots of semi-opaque yellow to the pumpkin and, in a more transparent manner, the girl's face. These last steps seem fairly insignificant, and you may say that the main idea of the painting was already stated in the previous stage - but they often take the longest time with a lot of reflection and evaluation. When my additions and refinements are no longer making the painting better, I declare it finished.
colleen
I find it important to take it slowly at the end, so that I have a lot of opportunities to step away from the painting and come back to it with a fresh eye. It helps me catch myself before I overwork it - although, of course, the level of finish is very subjective. Some other artist would have stopped twenty hours ago, while another one might want to work it to a more realistic stage.
Burning House Art Studio Watercolor Workshop
 Recently, Burning House Art Studio hosted my Intro to Watercolor course. It is a beautiful space and I really enjoyed having the class there. Definitely my favorite venue so far! The workshop was a bit short on students - but what they lacked in quantity, they made up for in quality :)
My typical first class homework assignment is this: paint an apple twice. Once, wet on dry, second time, wet-into-wet. I am lucky if I get two paintings out of each students for the critique at the beginning of the next class. This time, one of my students brought 13 paintings of apples. That's right, all of those apples below are by the same student. Talk about taking your art seriously! (I got about 20 more next time around :))

Another student has not picked up the brush since she was a kid. I usually let my students paint without help first, so that I can get a feeling for the level they are at and what they will need help with. Below, is her painting with and without my help.

I like quick, timed paintings. The idea is to set the timer for, say, 10 minutes, and go at it without too much thinking. Just let it happen. When the time is up, you put down your weapons and step away from the painting. This accomplishes several things:
- You can't help but loosen up, even if just a little bit
- You push through your initial hesitation and fear
- You only have to stick with it until the time is up - if it's a total failure of a painting, oh well! You only spent 10 minutes of your life on it. No big deal.
- Once in a while, you get gems! Loose, free, colorful - just like you like it!
Below are some examples of pretty awesome 10-minute paintings. Try it!


If you live in the high desert, come take a workshop at the Burning House Art Studio. My next class will be Intermediate Watercolor and will meet on Wednesdays, 10am- 1pm, starting on August 1. Hope to see you there!

Rainy Night in New Orleans
Rainy Night in New Orleans Watercolor Painting
in commissions
After a failed first painting and all those studies, this is where it took me. I am pretty happy with the end result, and so is my client :). A couple of lessons learned:
- When venturing out to paint an unfamiliar subject (and I've never been to New Orleans, as of today, or painted rainy nights. I have painted IN THE RAIN though) - when painting something new, it is a very good idea to do some studies. Duh! :)
- When stuck, ask for advice. Also obvious, but I'm one of those people who'd rather get lost than ask for directions. I reached out to people in the EDM group and my fan page on Facebook, and the feedback was extremely helpful.
- In addition to getting myself more familiar with the subject, the studies allowed me to try out color schemes and moods and kind of search my heart to figure out what I wanted out of this painting. I think the end result is fairly close to my initial vision.
- I need to paint more (and I could put the period here) scapes. Streetscapes, landscapes, cityscapes, seascapes. For a while now, I've had the idea of a painting project in my mind, something focused on landscapes. Maybe 30 days of landscapes. Or a landscape a week...if only I could rely on my kids to sleep simultaneously (which they never do, except at night).
In case you are wondering why I didn't sign this painting, I was asked not to do it on the front. The painting will be a part of a wall collage along with other artworks, illustrating events from the client's life. I guess the signature would be distracting or something...I'm very curious to see it when it's done.
So, what do you think about it?